Blog

Generate Wildcard Let's Encrypt Certificate with nginx and Namecheap

Categories:
Tags:

Namecheap offers SSL certificates support but it costs around $10 for the first year, where as there are free solutions to getting SSL for your website like Let’s Encrypt using Certbot. So, that’s why after 1 year with namecheap’s PositiveSSL I tried switching to the free Certbot solution.

 
In this tutorial we will cover how to generate a wildcard Let’s Encrypt certificate using Namecheap as the DNS and nginx as the web server on Ubuntu (22.04.3 for me).
Since there is no certbot plugin for namecheap, the method is more manual.

Prerequisites

CategoryRequired
SystemUbuntu in this tutorial
Softwaresnapd, OpenSSH - both are preinstalled on Ubuntu
AccessRoot privileges - user root or with sudo

Installing Certbot

Remove certbot-auto and any Certbot OS packages

If you have any Certbot packages installed using an OS package manager like apt, dnf, or yum, you should remove them before installing the Certbot snap to ensure that when you run the command certbot the snap is used rather than the installation from your OS package manager:

$ sudo apt-get remove certbot

Install Certbot

$ sudo snap install --classic certbot
certbot 2.7.4 from Certbot Project (certbot-eff✓) installed

Make sure that the certbot command can be run with this command:

$ sudo ln -s /snap/bin/certbot /usr/bin/certbot

Generate certificate

Run Certbot command

Now we have to manually generate the certificate which requires a lot of steps.
First, because we’re trying to get a wildcard cert, we need to add a certain TXT DNS record value to our Namecheap domain.
We can obtain a value for the TXT record from Let’s Encrypt with:

1
2
3
$ sudo certbot certonly \
  --server https://acme-v02.api.letsencrypt.org/directory \
  --manual --preferred-challenges dns -d "*.example.com" -d "example.com"

And replace example.com with your own domain (xxlsteve.net for me).
Here, -d "*.example.com" -d "example.com" assures that all subdomains will be allowed HTTPS, but also the root domain, example.com. If for instance you don’t need TLS/SSL for example.com for example because you access your site via www.example.com, you can simply put: -d *.example.com.

Add TXT record

After entering your email address, it should give you a value to add to a TXT record under the name:
_acme-challenge.example.com.

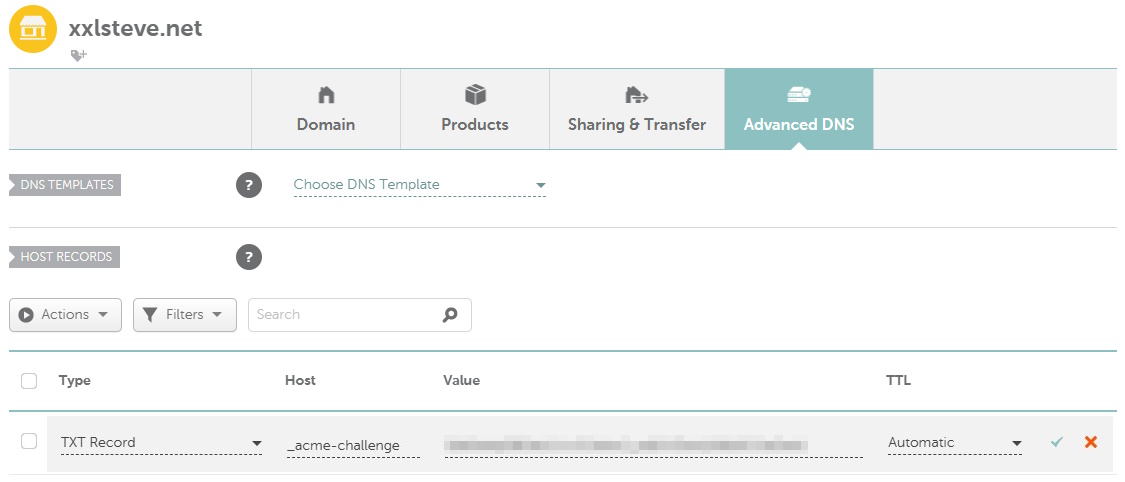
Go to your namecheap domain’s advanced DNS settings, and under host records, add a new TXT record.
Add _acme-challenge for the Host value and the given value to Value.

Now, wait until Namecheap has synced the new record (might take a minute). To test if it’s done, you can run this command on a command prompt:

nslookup -type=TXT _acme-challenge.example.com

(Of course, replace example.com with your domain)

If it succeeds it should return the following:

Server:         192.XXX.XXX.XXX
Address:        192.XXX.XXX.XXX
Non-authoritative answer:
_acme-challenge.example.com    text =

        "XXXXXXXXXXXXXXXXXXXXXXXXXXXXXXXXXXXXXXXXXXX"

Alternatively, you can use this online tool:
https://toolbox.googleapps.com/apps/dig/#TXT/_acme-challenge.example.com (replace example.com at the end).

Since it succeeded, you can now press Enter back in Ubuntu to continue the certificate creation process.

When that’s done, fullchain.pem and privkey.pem will be generated most likely in /etc/letsencrypt/live.

Command response and steps
 1
 2
 3
 4
 5
 6
 7
 8
 9
10
11
12
13
14
15
16
17
18
19
20
21
22
23
24
25
26
27
28
29
30
31
32
33
34
35
36
37
38
39
40
41
42
43
44
45
46
47
48
49
50
51
52
53
54
55
56
57
58
59
60
61
62
63
64
65
66
67
68
69
70
71
72
Saving debug log to /var/log/letsencrypt/letsencrypt.log
Enter email address (used for urgent renewal and security notices)
 (Enter 'c' to cancel): email@gmail.com

- - - - - - - - - - - - - - - - - - - - - - - - - - - - - - - - - - - - - - - -
Please read the Terms of Service at
https://letsencrypt.org/documents/LE-SA-v1.3-September-21-2022.pdf. You must
agree in order to register with the ACME server. Do you agree?
- - - - - - - - - - - - - - - - - - - - - - - - - - - - - - - - - - - - - - - -
(Y)es/(N)o: Y

- - - - - - - - - - - - - - - - - - - - - - - - - - - - - - - - - - - - - - - -
Would you be willing, once your first certificate is successfully issued, to
share your email address with the Electronic Frontier Foundation, a founding
partner of the Let's Encrypt project and the non-profit organization that
develops Certbot? We'd like to send you email about our work encrypting the web,
EFF news, campaigns, and ways to support digital freedom.
- - - - - - - - - - - - - - - - - - - - - - - - - - - - - - - - - - - - - - - -
(Y)es/(N)o: Y
Account registered.
Requesting a certificate for *.example.com and example.com

- - - - - - - - - - - - - - - - - - - - - - - - - - - - - - - - - - - - - - - -
Please deploy a DNS TXT record under the name:

_acme-challenge.example.com.

with the following value:

XXXXXXXXXXXXXXXXXXXXXXXXXXXXXXXXXXXXXXXXXXX

- - - - - - - - - - - - - - - - - - - - - - - - - - - - - - - - - - - - - - - -
Press Enter to Continue

- - - - - - - - - - - - - - - - - - - - - - - - - - - - - - - - - - - - - - - -
Please deploy a DNS TXT record under the name:

_acme-challenge.example.com.

with the following value:

XXXXXXXXXXXXXXXXXXXXXXXXXXXXXXXXXXXXXXXXXXX

(This must be set up in addition to the previous challenges; do not remove,
replace, or undo the previous challenge tasks yet. Note that you might be
asked to create multiple distinct TXT records with the same name. This is
permitted by DNS standards.)

Before continuing, verify the TXT record has been deployed. Depending on the DNS
provider, this may take some time, from a few seconds to multiple minutes. You can
check if it has finished deploying with aid of online tools, such as the Google
Admin Toolbox: https://toolbox.googleapps.com/apps/dig/#TXT/_acme-challenge.example.com.
Look for one or more bolded line(s) below the line ';ANSWER'. It should show the
value(s) you've just added.

- - - - - - - - - - - - - - - - - - - - - - - - - - - - - - - - - - - - - - - -
Press Enter to Continue

Successfully received certificate.
Certificate is saved at: /etc/letsencrypt/live/example.com/fullchain.pem
Key is saved at:         /etc/letsencrypt/live/example.com/privkey.pem
This certificate expires on 20XX-XX-XX.
These files will be updated when the certificate renews.

NEXT STEPS:
- This certificate will not be renewed automatically. Autorenewal of --manual certificates requires the use of an authentication hook script (--manual-auth-hook) but one was not provided. To renew this certificate, repeat this same certbot command before the certificate's expiry date.

- - - - - - - - - - - - - - - - - - - - - - - - - - - - - - - - - - - - - - - -
If you like Certbot, please consider supporting our work by:
 * Donating to ISRG / Let's Encrypt:   https://letsencrypt.org/donate
 * Donating to EFF:                    https://eff.org/donate-le
- - - - - - - - - - - - - - - - - - - - - - - - - - - - - - - - - - - - - - - -

nginx

Now you just need to include the newly generated certificate in your nginx website’s configuration. The most basic (but not secure!) implementation would be these 2 lines in your server block:

1
2
3
4
server {
  ssl_certificate /etc/letsencrypt/live/example.com/fullchain.pem;
  ssl_certificate_key /etc/letsencrypt/live/example.com/privkey.pem;
}

Renewal

The certificate needs renewal every 90 days, though preferably every 60.
While the default Cerbot installation methods provide automatic renewal, the manual installation needs to be combined with an authentication hook script via --manual-auth-hook. That is, running the original command would instead be:

1
2
3
4
5
$ sudo certbot certonly \
  --server https://acme-v02.api.letsencrypt.org/directory \
  --manual --manual-auth-hook /path/to/dns/authenticator.sh \
  --manual-cleanup-hook /path/to/dns/cleanup.sh \
  -d secure.example.com --preferred-challenges dns -d "*.example.com" -d "example.com"

This will run the authenticator.sh script, attempt the validation, and then run the cleanup.sh script.

 
However, these scripts need access to Namecheap’s API to perform the otherwise manually done task of validation. But the criteria to qualify for API access is the following:
“Account balance of $50+, 20+ domains in your account, or purchases totaling $50+ within the last 2 years.”
…which is probably not the case for you.

Since automatic renewal is not possible because of Namecheap API criteria, the only option left is the manual way. That means running the same command every 60 to 90 days, and therefore repeating the task of adding a TXT record to your domain, etc.

And that’s why, after further consideration, I had to stick with namecheap’s PositiveSSL offer, in spite of its support of only the root domain and no subdomains.